
Guide
Installing my thermal printer
Network or USB?
I want to install my printer on the network
When printing via network, the message "Printing complete" appears but no label has been printed
When printing via network, the message "Sorry, we encountered a problem while printing" is displayed
When printing via network, when I confirm, no message is displayed on the screen and no label is generated
For a network installation, how can I change my printer communication port?
I need to install Java. How?
How to enable Java?
I want to install my printer via USB
I want to install the USB drivers for my thermal printer
When printing via USB, my printer stops and displays "Printing 1 of 1". What to do?
When printing via USB, the message "The transport label has been paused in the print queue" is displayed, but the label does not come out. What to do?
When printing via USB, the message "Printer 'X' was not detected on your computer" is displayed although the printer is properly installed. What to do?
When printing via USB, the page is stuck on "Printing in progress". What to do?
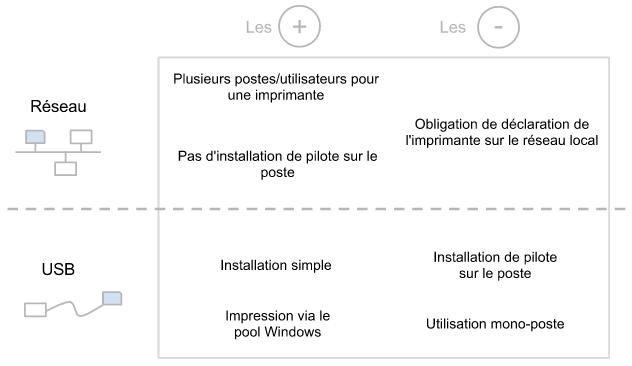
I want to install my printer on the network
Requirements
Thermal printing only works with the "One-Click" shipping procedure of the www.chronopost.fr. website
You must use one of the following browsers:
- Google Chrome,
- Firefox 4 or later,
- Safari 5 or later,
- Internet Explorer 7 or later.
We recommend that you do not use Internet Explorer 8, as it has known compatibility issues.
You must also have an enabled and up to date version of Java. Java may be installed and enabled via your browser (see installation and activation process later in this document). Once Java has been installed and enabled, when opening the "One-Click" page, you must authorize the Java applet (details outlined in the installation process below).
Installation Process
1. Plug the printer into a network jack using the Ethernet cable provided by Chronopost. Do not use the USB cable supplied with the printer as it will not function.
2. Depending on your company's network policy, it may be necessary to announce the printer on your network. Contact the technicians or network administrator of your company to help you to do this. If your network is open, the printer will automatically retrieve an IP address when it is connected to it.
Good to know: If your network runs through a market standard box (Freebox, Livebox, etc.), you must set this box to "router" mode via the box's administration panel in order to run your PC43d printer. Be careful: with a market standard box, it is possible that the IP assigned to the printer will change each time you restart the printer and/or the box! It will then be necessary to modify the print settings again in 'my profile' --> 'my preferences'. To avoid this, you can assign a fixed IP to the printer.
Good to know: To announce the printer on a corporate network, your network administrators or technicians will need the printer's MAC address. This is displayed on a sticker on the underside of the printer.
3. You will need to enter the IP address of the printer in the chronopost.fr menus. To find the printer's IP address, go to the printer menu (directly on the printer).
- Press the home button on the printer (house symbol),
- Enter the password "8311",
- Go to the menu "Ethernet IPv4 communications" by navigating through the printer menu.
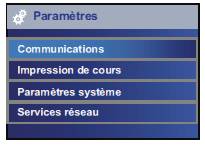
Thermal printer menu
4. At chronopost.fr
- Log in with your username and password,
- Go to your account, in the "My preferences" profile section,
- Select the printing type "thermal printing".
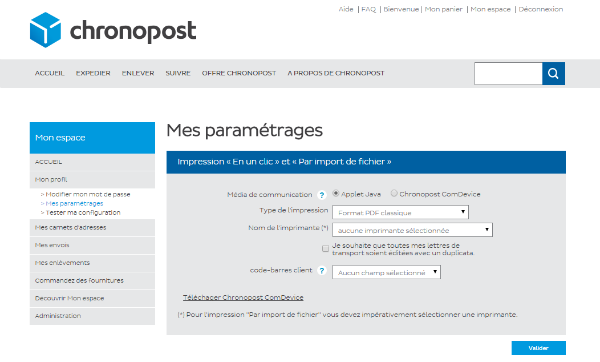
"My preferences" screen
- Enter the IP address and port (by default, use port 9100, which is the default port for the printer) then confirm your changes.
Good to know: if necessary, you can change the printer's listening port in its menu. Caution: this operation should only be performed by a technician or network expert!
Good to know: you can enter a device name rather than an IP name in the chronopost.fr "My preferences" menu. This is useful if your network assigns dynamic IP addresses to connected devices. Once again, get help from your company's technician or network engineer.
- For more details on hardware installation, please visit the Intermec PC43d Configuration Manual
5 In the "SHIPPING" menu, click on "One-Click" shipment. A security warning should appear. Click on "Run".
6. You will then be able to fill in the page, and start printing. The label should be printed by the thermal printer.
When printing via network, the message "Printing complete" appears but no label has been printed
- Please make sure that the communication port entered in the application is the same as that stated in your printer (use port 9100 by default)
- You should not be trying to navigate through the menu on the printer itself, but rather the home screen (which should be marked "ZSim 6.000428 Autohunt"
- Please ensure that the printer is properly loaded with paper and that the cover is closed
- Sometimes the printer is simply blocked. In this case, turn it off and then on again
- Please ensure that when it is on the main menu, the printer displays "Zsim 6.000428 Autohunt". If anything else is displayed (especially "ZSim AutoHunt 6.05 A10" or "A10 ZSim 6.10 Autohunt" the firmware is not up to date. In this case, please contact your Chronopost Services Center.
When printing via network, the message "Sorry, we encountered a problem while printing" is displayed
There are several possible causes:
- The printer is not connected or not properly connected to the network,
- The printer is not switched on,
- Make sure that the printer has the correct IP address. To make sure that the printer responds to that IP address, go to the address http://XXX.XXX.XXX.XXX (where XXX.XXX.XXX.XXX is the IP address of your printer).
- A printer configuration page will normally be displayed at this address, which appears as shown below:
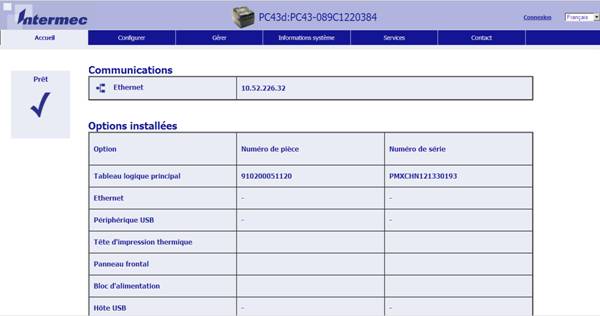
Printer configuration page
If nothing appears, you are not using the correct IP address.
You can find the printer's IP address in the printer menu (procedure detailed in the installation guide of the previous chapter).
This can occur if the applet was not accepted.
Solution: close the browser completely (all tabs), reopen it, return to the "One-Click" shipping screen and authorize the application to be run
This can also occur when your browser's version of Java is not up to date or disabled.
For a network installation, how can I change my printer communication port?
- Press the Home button (house symbol) on your printer,
- Enter the password "8311" on the printer,
- Go to the Network Services menu at Net01,
- The port number is displayed and may be changed,
- Then restart the printer.
Go to Java's official website and click on "Free Java Download".
Do you need help with this installation? Use the Java Help page.
Follow the steps below, according to your operating system and browser.
Internet Explorer (Windows)
- Click on Tools then Internet Options,
- Then click the Security tab and click the Custom Level button,
- Scroll down to Java applets Script,
- Make sure that the Enabled radio button is checked,
- Click OK to save your preferences.
Chrome (Windows)
- Click on the wrench symbol, and select Options,
- Select Advanced, and then Content Settings in the Privacy section,
- The Content Settings panel opens,
- In the Plug-ins section, select the link Disable individual plug-ins to check if Java is enabled,
- Click the Enable link (if the Disable link appears, it means that Java is already enabled).
Note: You can also access plug-in settings by entering "about:plugins" in the browser address field.
Firefox (Windows and Mac OS X)
- Start the Mozilla Firefox browser or restart if it is already running,
- At the top of the browser, select the Firefox button (or the Tools menu in Windows XP), then more Add-ons,
- The Manage Add-ons window appears,
- In the Manage Add-ons window, select Plugins,
- Click the Java (TM) Plugin Platform to highlight it,
- Click the Enable button (if the button says Disable, it means that Java is already enabled).
Safari (Windows and Mac OS X)
- Start the Safari browser,
- Click on Safari and select Preferences,
- Click the Security tab,
- Check (select) the Enable Java checkbox,
- Close the Safari Preferences window.
Opera 4.x and later (Windows and Mac OS X)
- Opera for Windows does not use Java, but an embedded version already exists in the Opera Web browser,
- It is possible that Opera supports Java for other platforms. Refer to the documentation for your Opera platform
- For more information, see the following article: Support for Java software in Opera.
We suggest using Google Chrome, Safari or a recent version of Firefox to use the "One-Click" application for thermal printing.
I want to install my printer via USB
Requirements
Thermal printing only works with the "one-click" shipping procedure at the www.chronopost.fr. website. You must use one of the following browsers.
- Google Chrome,
- Firefox 4 or later,
- Safari 5 or later,
- Internet Explorer 7 or later.
We recommend that you do not use Internet Explorer 8 as it has known compatibility issues. You must also have an enabled, up to date version of Java. Java may be installed and enabled via your browser (see installation and activation process later in this document).
Once Java has been installed and enabled, when opening the "One-Click" page, you must authorize the Java applet (details outlined in the installation process below).
USB Installation Process
1. Connect the printer to a USB port using the USB cable provided by Chronopost. Do not use the network cable provided with the printer: it will not function for this purpose.
2. You must install the printer drivers, which may be downloaded here or in the chronopost.fr "My preferences" menu after selecting the "ZPL Thermal Printing" print mode.

"My Preferences" Screen
3. Follow the driver installation process (described below).
4. At chronopost.fr:
- Log in with your username and password,
- Go to My Account, in the "My profile" section of "My preferences",
- Select the "ZPL thermal printing" printing mode.
- Select the printer you have just installed in the "Printer Name" field.
This system is compatible with all thermal printers that use ZPL. It will not work with laser printers!
- For more details on hardware installation, please visit the Intermec PC43d Configuration Manual
5. In the "SHIPPING" menu, click on "One-Click" shipment. A security warning should appear. Click on "Run".
6. You will then be able to fill in the page, and start printing. The label should be printed by the thermal printer connected via USB.
I want to install the USB drivers for my thermal printer
Warning: before installing the printer drivers, connect it to your computer then switch it on. Wait for it to finish starting up. Wait until Windows detects new hardware to begin the installation procedure.
Download the drivers from the Intermec website then run the file. Make sure you download the correct driver for your version of Windows.
Accept the license terms, then click "Next". The files required for installation of the drivers are then unpacked in your chosen directory (C:\Intermec\Drivers for example).
Go to the unzipped folder (C:\Intermec\Drivers for example).
Double-click the DriverWizard.exe file. This action will launch the driver installation process for your thermal printer.
Step 1
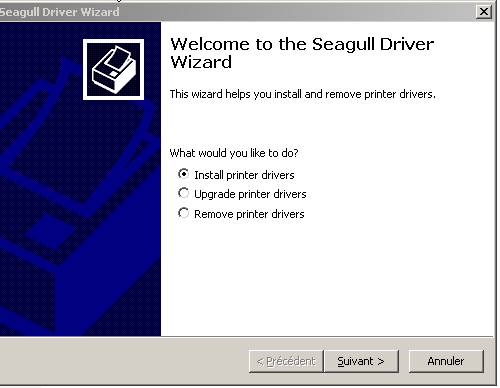
Check "Install printer drivers" Then click " Next"
Step 2
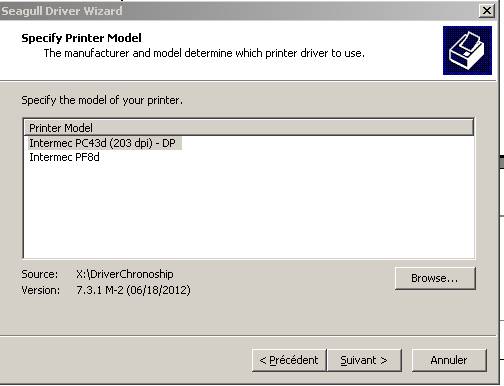
This screen allows you to choose the model of printer that you want to install the printer drivers for. The model of your thermal printer is written on the cover (it must be a PC43d).
Chose the model that you will be using and click the "Next" button.
Step 3
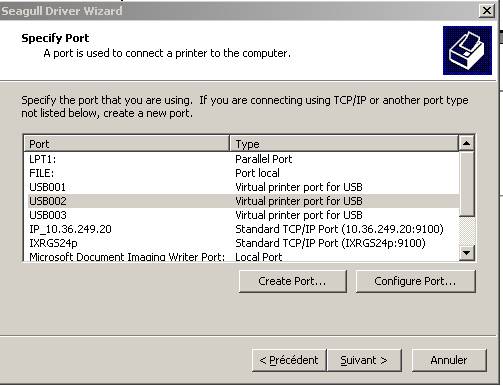
Click "Next".
Step 4
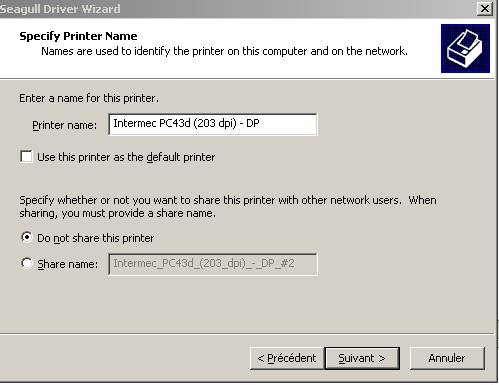
Click "Next".
Step 5
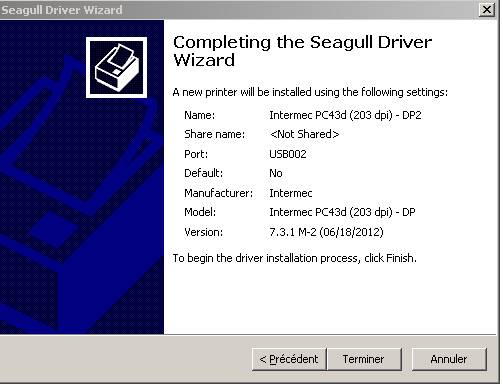
Click the "Finish" button to complete the printer driver installation.
When printing via USB, my printer stops and displays "Printing 1 of 1". What to do?
In the short term, the only way to solve this is to turn the printer off and then on again. If the problem occurs frequently, the firmware for your printer is out of date (likely for clients who received their printer prior to 04/01/2013).
Check the message displayed on the main screen of the printer. If it says "ZSim 6.05 Autohunt A10" or "ZSim 6.10 A10 Autohunt" you do not have the latest firmware. The latest firmware displays " ZSim-6.000428 Autohunt".
If you do not have the latest firmware, please contact the Chronopost services center for them to send you a new printer.
This means that the chronopost.fr application has indeed sent the printing job to the Windows printer pool. You can check this in your print queue via the usual method.
If printing does not start, it means that windows cannot reach the printer. Check that the USB cable is connected, and that the printer is activated (check that the printers' administration panel shows "Ready" status).
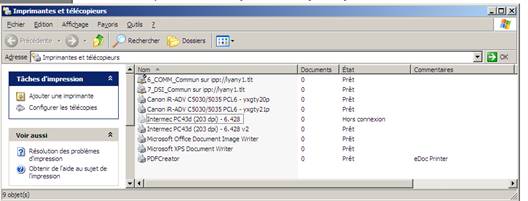
If necessary, try a printer reboot and reinstall the drivers.
This can occur with the latest versions of Java. To work around this problem, do NOT check the "Always allow this applet to access the printer" when the applet warning popup is displayed.
When printing via USB, the page is stuck on "Printing in progress". What to do?
This can occur when Java is not installed, or not enabled in your browser. Please see previous section "I want to install/enable Java".
